Showing posts with label thrifty living. Show all posts

Monday, April 8, 2013

Dandelion Cookies -- Part 2 of Eat Your Weeds

Last week I posted about making Chickweed Pesto out of common chickweed you can find growing in your yard.  This weekend my 5 year old grandson Aydan came over and we harvested dandelions from the yard and made Dandelion Cookies (thus, Part 2 of Eat Your Weeds).


We had to look all over the yard, in many nooks and crannies to pick a half cup of dandelion flowers.  Our neighbor's front yard is full of dandelions, but since they have used a yard service for many years (which sure doesn't seem to do much good!), I had to explain to Aydan that we can't eat those flowers, only ones that are in our yard that we know are safe.


This one was actually in a garden bed, snuggling up with some collards.

our neighbor's front yard

part of MY front yard
After we collected about 1/2 cup of dandelion flowers, Aydan helped me pull out the yellow petals, throwing the green calix parts into the compost bucket.  Then we mixed them in with 1/2 cup of oil and 1/2 cup of honey, 1 teaspoon of vanilla, and 2 eggs.


We poured this wet mixture into the dry ingredients (1 cup of whole wheat flour, 1 cup of regular oats, and a pinch of salt) and Aydan stirred it all up.  We dolloped tablespoons of the cookie batter on to a greased cookie sheet.


Into the preheated 375 degree oven for about 12 minutes.


Perfect for a little picnic outside on our first warm, sunny Saturday in many a month!


Simple ingredients, using what we have in the pantry and the yard.

Linking to Tuesday Garden Party


Tuesday, April 2, 2013

Chickweed Pesto (more growing food without a garden)

notice there are only 5 petals, but they are deeply split, making it look more daisy-like

What a cold and wet spring we have had here so far!  I've barely been able to do anything in the garden.  Our March temperatures have averaged 20 degrees colder than last year's March.  Last March was too warm by 5-10 degrees, but you'd think we could have some "normal" more moderate weather!

My collards and pak choy that have grown so well and keeping me in greens through the winter are
bolting (evidently the bolting has more to do with longer days than warmer temperatures).  The cold and wet have kept me from planting much in the garden for spring, and I'm afraid now it may be too late for a good spring harvest of radishes, sugar snaps, and lettuce before we hit the hot summer temperatures.


Since I haven't dug much in the garden yet, nor emptied pots around the yard from last season, I have a good bit of chickweed growing everywhere.  Chickweed loves to grow in cultivated ground -- garden beds and pots.  It is also easily found growing in a lawn that is not sprayed.   It's easy to pull out, and of course the chickens LOVE it -- but it is also a pretty tasty edible that you can add to salads or use as a sandwich topping like lettuce or sprouts.


The other day I went out to the yard and just snipped some plants off from the base and brought them in and made a pesto spread.  We don't spray any of our yard with pesticides or herbicides, and we live on a residential street so I feel we don't need to worry about too much pollution from cars affecting the plants.  A couple of snips yielded about 2 or 3 cups, which I cut up with scissors in the bowl so the long stems would not tangle in my food processor blade.


Into the food processor, with 4 cloves of minced garlic (because I like lots of garlic), 1/2 cup of olive oil, 1/4 cup of parmesan, a tablespoon of lemon juice and some lemon balm I found growing in the herb garden, a dash of salt, some pepper, and a handful of walnuts.


Chickweed Pesto!  We used it on crackers and with chips.  It had a fresh lemon-y flavor and kept its color over the several days it lasted.  I used the remainder then in a pesto-bean-syrian (thinly sliced red onions, roasted mini-peppers, tomatoes, green beans, olives and feta with the pesto mixed in a lemony oregano vinaigrette) kind of salad to go with the Vegetable Pastitsio I made for Easter dinner.

I love to eat my weeds!

Joining Tuesday Garden Party; Backyard Farming Connection Blog Hop; Farmgirl Friday Blog Hop

Monday, February 11, 2013

Gardening WITHOUT a Garden! Growing Sprouts


There is something about harvesting delicious veggies straight from one's own garden and eating it the same day!

But for some, time, space, and even health constraints may make planting and caring for even the smallest garden seem a bit overwhelming.

Growing sprouts can catapult the would be gardener beyond all of those hurtles!  It is the easiest!  Requires only the simplest equipment, found in any household, no soil, no pots, no outdoor space at all!

All you need are some sprouting seeds (buy seeds suitable for sprouting and eating -- conventional seeds for planting may not be the freshest and may even be treated with anti-fungal agents);  a quart size jar of some sort, and something to put over the top of the jar that you can drain water through when you rinse the sprouts (or a cover that can breath, at least, like cheesecloth or a paper towel -- then you will need to drain and rinse the sprouts through a strainer or colander and replace back in the jar, rather than rinse and drain directly in the jar); a counter where you can keep the jar so you see it and won't forget about it; and maybe some indirect sun from a window to green the sprouts up on the last day in the jar.

And talk about economical!  I do believe sprouting must be the most economical form of home gardening there is, with the highest return on one's investment.  I calculated that my investment in a $4.99 8oz packet of "salad mix - alfalfa, radish, and broccoli" sprouting seeds will yield the equivalent of $54.00 worth of sprouts purchased from a grocery in my area.  Add to that the economy of being able to sprout what one needs -- so that hopefully one is not left with half a plastic clamshell of sorry dilapidated uneaten sprouts, it is very economical indeed.


And I can tell you that the quality and flavor, the juiciness and crunch, of sprouts that you have grown yourself, eaten within days of their first sprouting, is far superior to anything you can buy at a store, where it's been shipped and held who knows how long.  And growing it oneself avoids the problems with contamination that commercially grown sprouts have suffered from in the past year or so.

Here is how I grow a quart of sprouts:

Buy seeds (I found mine at Whole Foods).

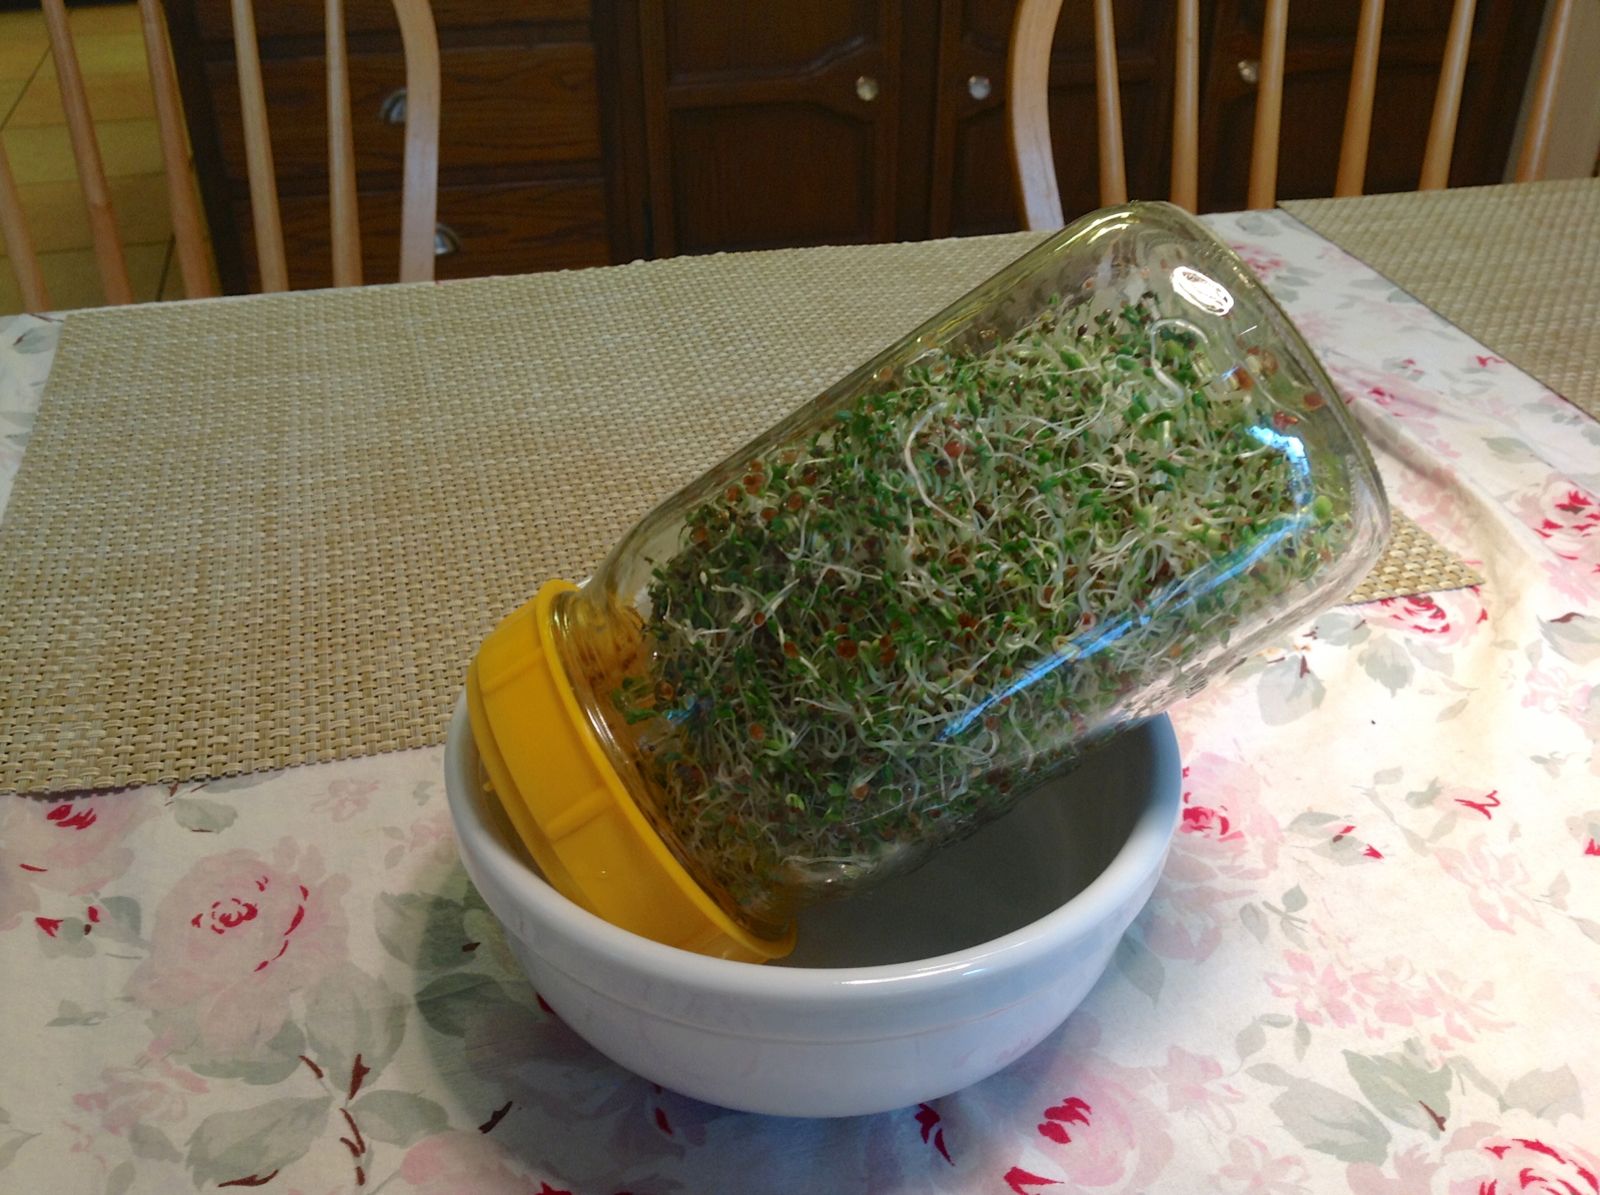
Measure out 2 teaspoons, and soak them in warm water for a few hours in a quart jar.  I have a set of plastic lids with holes in them that I got way back in the 70's when sprouting was required for any self-respecting reader of Mother Earth News.  These lids fit any wide mouth quart jar.

Drain the seeds, and prop the jar so that any excess water can drain out.  You want the seeds to stay moist, but not swimming.


Now, at least 2 times a day (morning and night) -- 3, if you can remember -- pour some fresh water on to the seeds, swish them gently, rinsing them, then drain the water out.


On the third day maybe scooch the jar a little nearer to a window (not in full sun! they would cook then), so the light will green them up a bit.  On the third or fourth day they are ready to eat!  Keep your uneaten sprouts in container in the fridge.  Easy Peasy.  Growing your own food just doesn't get any simpler.


And here's my lunch that very day (bought and soaked the seeds on Sunday, lunch on Wednesday.


As usual, my photos do not do it justice, but here is my sandwich -- whole wheat bread, spread on one side with mayo with a bit of pesto mixed in, and on the other with a bit of leftover chickpea puree from the previous dinner, and for the filling:  bacon, cucumber slices, sun dried tomatoes (much better than so-called "fresh" tomatoes in the winter time!), sliced avocado, and fresh sprouts.


It was so good, I had the same thing for lunch on Thursday!

Linking to The Backyard Farming Connection Blog Hop; Sunny Simple Sunday; Tuesday Garden Party

Monday, February 4, 2013

Quesadillas with pork and sweet and salty glazed onions

Oh this was yummy!  So yummy I forgot to take a picture of it plated up and I'm trying to refrain from posting pictures of half-eaten food.

Quesadillas made with left-over pork, and my most favorite condiment or "relish" -- sweet and salty glazed onions.

It all began yesterday, when to celebrate Downton Abbey Sunday, I made some barbecue boneless country style ribs, along with roasted carrots and potatoes and an especially nice salad with Asian stir fry greens from my winter garden, topped with clementine orange slices, cucumber slices, and avocado, dressed with a citrus dressing of equal parts olive oil and lime juice, salt, pepper, and minced red onion, sprinkled with lightly toasted sunflower seeds.

A special dinner for a special Sunday.  I heard that there was some sports show on another channel last night, but I don't really know anything about that ;-)

But the dinner I made tonight with the leftover pork -- sublime!  And simple.

1.  cube up leftover pork (theoretically you are supposed to shred these things, but shredding was not happening).

2.  fix up a batch of Sweet and Salty Glazed Onions (3 or 4 onions, sliced, sauteed in olive oil for 10 minutes or so until softened, stir in 1/4 cup of balsamic vinegar and 2 T red wine (I didn't have wine, so I used balsamic vinegar and a good red wine vinegar), 3 T sugar, 1 t salt, 1/2 t freshly ground pepper -- and let all of this cook on low for about 20 or 30 minutes until thick and syrupy.


3.  Make a quesadilla using cheese (provolone or a smoky cheese is especially good), the pork, and the onions.

yum yum.  It was one of those meals you just want to keep eating even after you are full (so best just make one per person so you won't be tempted!)

I've also been busy with other matters.

Found some sprouting seeds at Whole Foods, so I dug out my c. 1976 sprouting lids and did up some seeds.  This is a 3 seed salad mix, with alfalfa, radish, and broccoli seeds.  Should be ready in 4 or 5 days.

super scientific hygienic seed sprouting method


I also replaced some pictures over the couch in our family room with some panels I found on sale at Pier One for less than $10.00 each!

Here is the wall with its tired old pictures and arrangements -- I had bought those pictures at an auction in Hernando, Mississippi over 20 years ago for around $1.50 each and they've been hanging there for 15 years!


Time for a change -- here are the new ones (our family room is rather dark, it only has one window which looks out onto our screened porch).


Much improved.  I think it really freshens up the room.

The picture on the left actually covers up a huge hole in the wall where the stupid non-functioning 1970's coppertone colored intercom/radio went that we ripped out -- which thus dictates all the furniture placement.  I guess one day we will have to deal with the hole in a more reasonable way.

Monday, January 21, 2013

The Paper Towel Dilemma

First, a picture of my daughter and her friend ready to head to an Anime convention held at the Memphis Botanic Garden this weekend.  Cree is a "My Little Pony", and her friend has been "consumed by darkness".  I'm sure you can guess which is which in the picture.  Cree and her friends love to CosPlay (dress up in costume) and the environment at the Botanic Garden was a very nice, safe venue.


Now, on to paper towels.

Oh, the dilemma of Paper Towels!  So handy and convenient, yet wasteful, kind of expensive, and guilt inducing (at least for those of us that worry about waste and recycling and frugality and such -- I have to add that I know many many worthy, considerate, kind people who never give paper towels a single thought).


Years ago when I had cloth diapered babies, and ultimately 4 children, we eliminated paper napkins from our house and began exclusively using cloth napkins.  Since we seemed to be doing laundry all of the time, adding cloth napkins to the mix did not seem burdensome at all -- and so we have continued over the years.  The napkins live in a drawer in the kitchen peninsula between the cooking area and the eating area, facing the table -- so they are very convenient to get to when we need them.


But paper towels remained in our lives.  Until recently.  I figured out a solution that works for our kitchen layout and keeps things handy and convenient.

1.  We do keep one roll of paper towels, because sometimes things come up that you just want to use a paper towel for -- you don't want to put anything in the wash -- you just want it GONE.  I won't elaborate on what those occasions are for me, but I'm sure you might have your own list.

We keep the roll in the utility closet in the kitchen, so it's there when we need it, but not so convenient that we automatically grab it for spills and clean up, microwaving, crumb catching or whatever.


2.  I purchased a pack of 12 smallish white washcloths at Target when they were on sale with all the dorm stuff back in the fall ($4.99) and started out with that, and later augmented that with a purchase of 12 (I think -- or maybe it was 24) very ample white washcloths from Costco for about $16.00.  White, so they can easily be bleached if we want.


3.  Half of these I keep in a plastic bin under the sink on the "cooking" side of the peninsula.  The other half I keep rolled nicely in a wicker basket on TOP of the peninsula, accessible from both sides of the kitchen where we used to keep the paper towels.  This means we can easily get one of these cloths when we need one from both sides of the kitchen, and the basket keeps them looking nice.


4.  We have a bag hanging inside the utility closet where we throw any soiled cloth napkins and washcloths, making it easy to get them out of the way and to tote to our laundry area (which is upstairs).


Since we adopted this approach, one paper towel roll has lasted us for months!

Now, I must be honest -- if I had small children, and most especially boys -- I am pretty sure I would be using paper towels still!


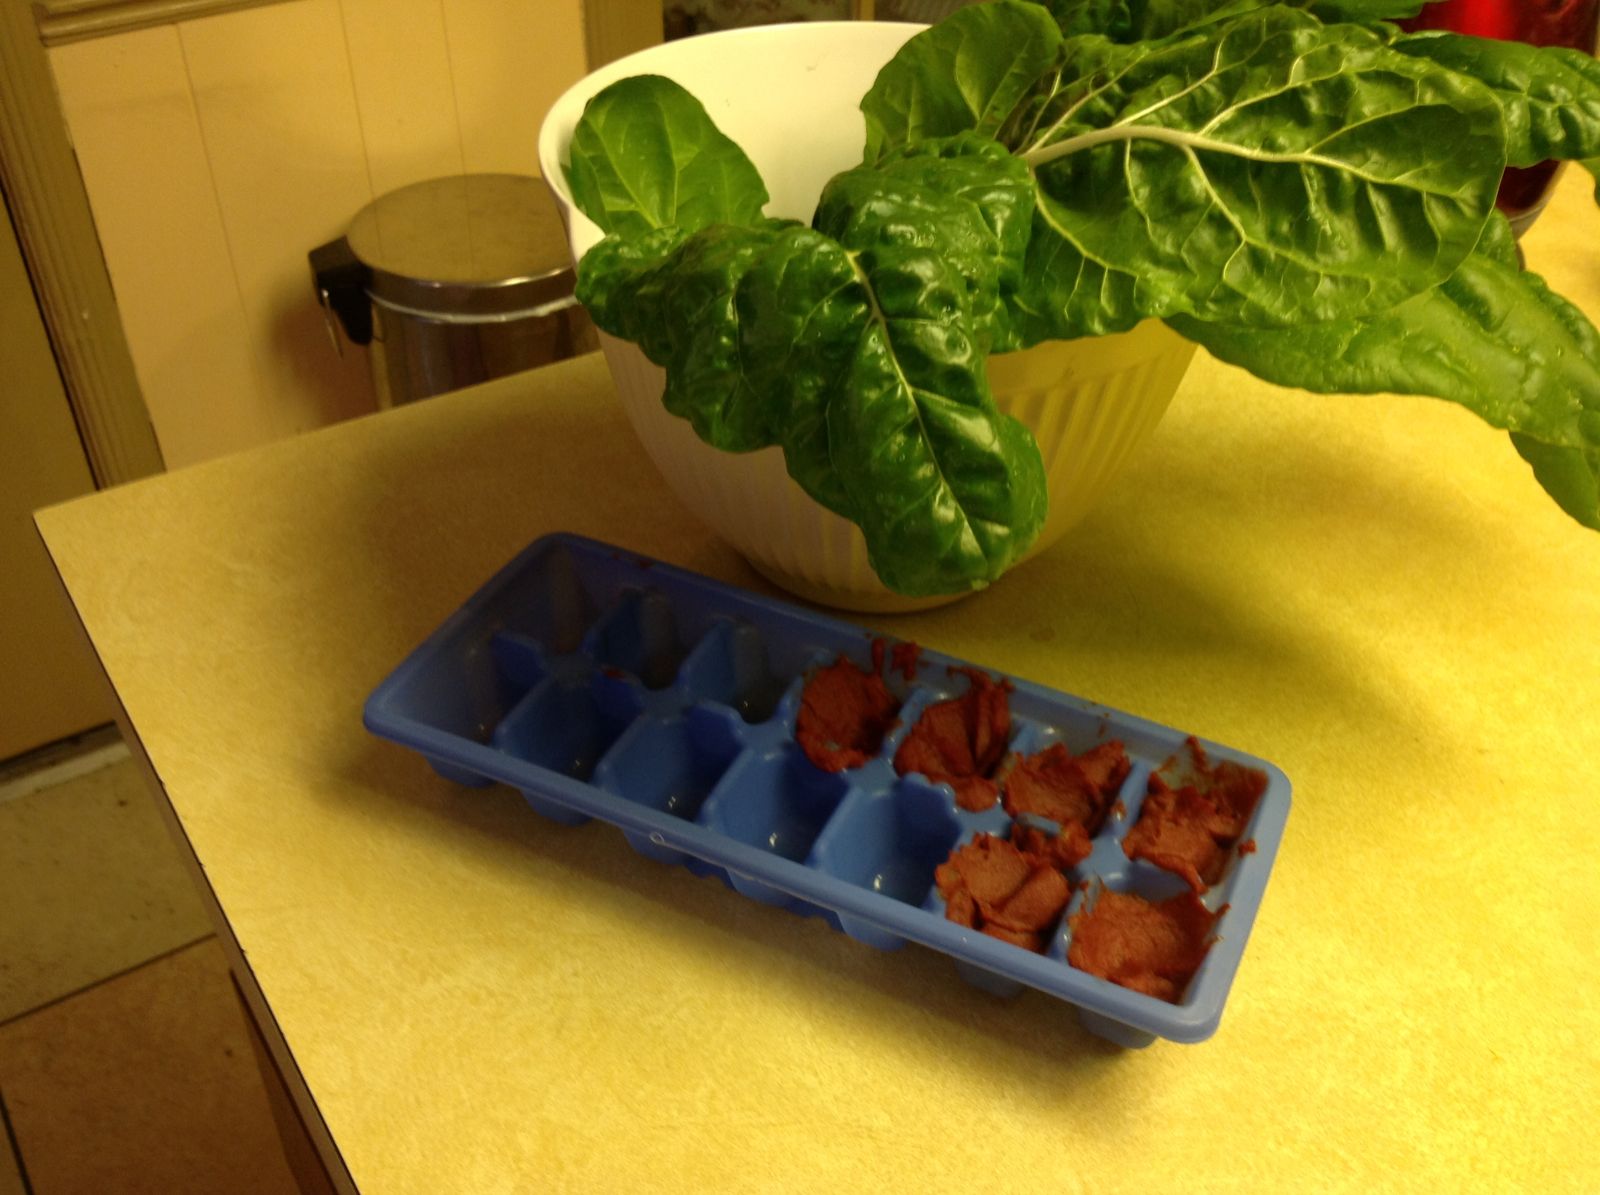
Bonus Frugal Tip:  When I open a can of tomato paste, I use what the recipe calls for (often just one or two tablespoons), and then put the remainder in an ice cube tray and put it in the freezer.  After it's frozen, I pop the tomato paste cubes into a freezer bag and keep handy in the freezer part of the fridge.  One can lasts a good long while that way, before I have to purchase another one.

Sharing with Sunny Simple Sunday; Farmgirl Friday Blog Hop